
The most popular advice about how to pass a home inspection starts with cleaning, fresh paint, and replacing light bulbs. Those tasks have their place, but they're not a strategy for dealing with a leaking basement, unsafe wiring, or a furnace that needs professional evaluation. Prepare the house for scrutiny, not for a better first impression.
In older Chicago-area homes, the useful question isn't whether an inspector will find something. It's which findings deserve immediate attention, which need more investigation, and which belong in a reasonable negotiation.
Table of Contents
- What Passing an Inspection Actually Means
- The Inspection Timeline From Contract to Closing
- Preparing the Property Room by Room
- The Most Common Inspection Findings and How to Triage Them
- Chicago-Specific Hazards Worth a Separate Inspection
- Negotiating Repairs, Credits, and Concessions After the Report
- Inspection Day, Closing, and What Comes Next
What Passing an Inspection Actually Means
A home inspector doesn't award a passing grade. The inspector assesses observable conditions and documents defects, safety concerns, and systems that aren't functioning properly or appear near the end of their service life. Buyers and sellers then decide what those findings mean for their transaction.
The profession developed around buyers' need for reliable information before purchase. ASHI was founded in 1976 and introduced its first Standard of Practice and Code of Ethics in 1977, establishing a framework for consistent observations rather than a guarantee of defect-free housing, as described in ASHI's history of home inspections.
That distinction matters when you're preparing an older home. An aging roof isn't automatically the same problem as an actively leaking roof. A serviceable older furnace deserves a different conversation from equipment that a specialist identifies as unsafe.
Define a useful outcome
Reporting summarized in this discussion of inspection-related home problems suggests that roughly 86% of homes have an issue requiring attention. Treat that as context, not a prediction about an individual property or a reason to dismiss serious findings.
A productive inspection should leave the parties with:
- Clear observations. The buyer understands what the inspector saw, rather than relying on assumptions about the home's age.
- Defined uncertainties. Questions needing a roofer, electrician, plumber, or other specialist are identified.
- Usable evidence. Existing repairs can be evaluated against records rather than verbal assurances.
- A manageable response. The parties can separate urgent conditions from ordinary ownership responsibilities.
Practical rule: Don't measure success by the length of the report. Measure it by whether the important risks are understood.
The inspector's independence matters, too. Choose someone who explains limitations, writes clearly, and distinguishes an observed defect from a recommendation for further evaluation. A reassuring conversation isn't a substitute for a useful written report.
For sellers, the strongest position isn't claiming that everything is perfect. It's accurately representing the property and being prepared to address material concerns without turning every maintenance comment into a dispute.
The Inspection Timeline From Contract to Closing
Start with the signed contract, not an assumed inspection schedule. Ask your agent and attorney to identify the inspection deadline, notice requirements, and any separate deadlines for environmental testing or specialist evaluations. Don't assume an appointment automatically extends the time available to respond.
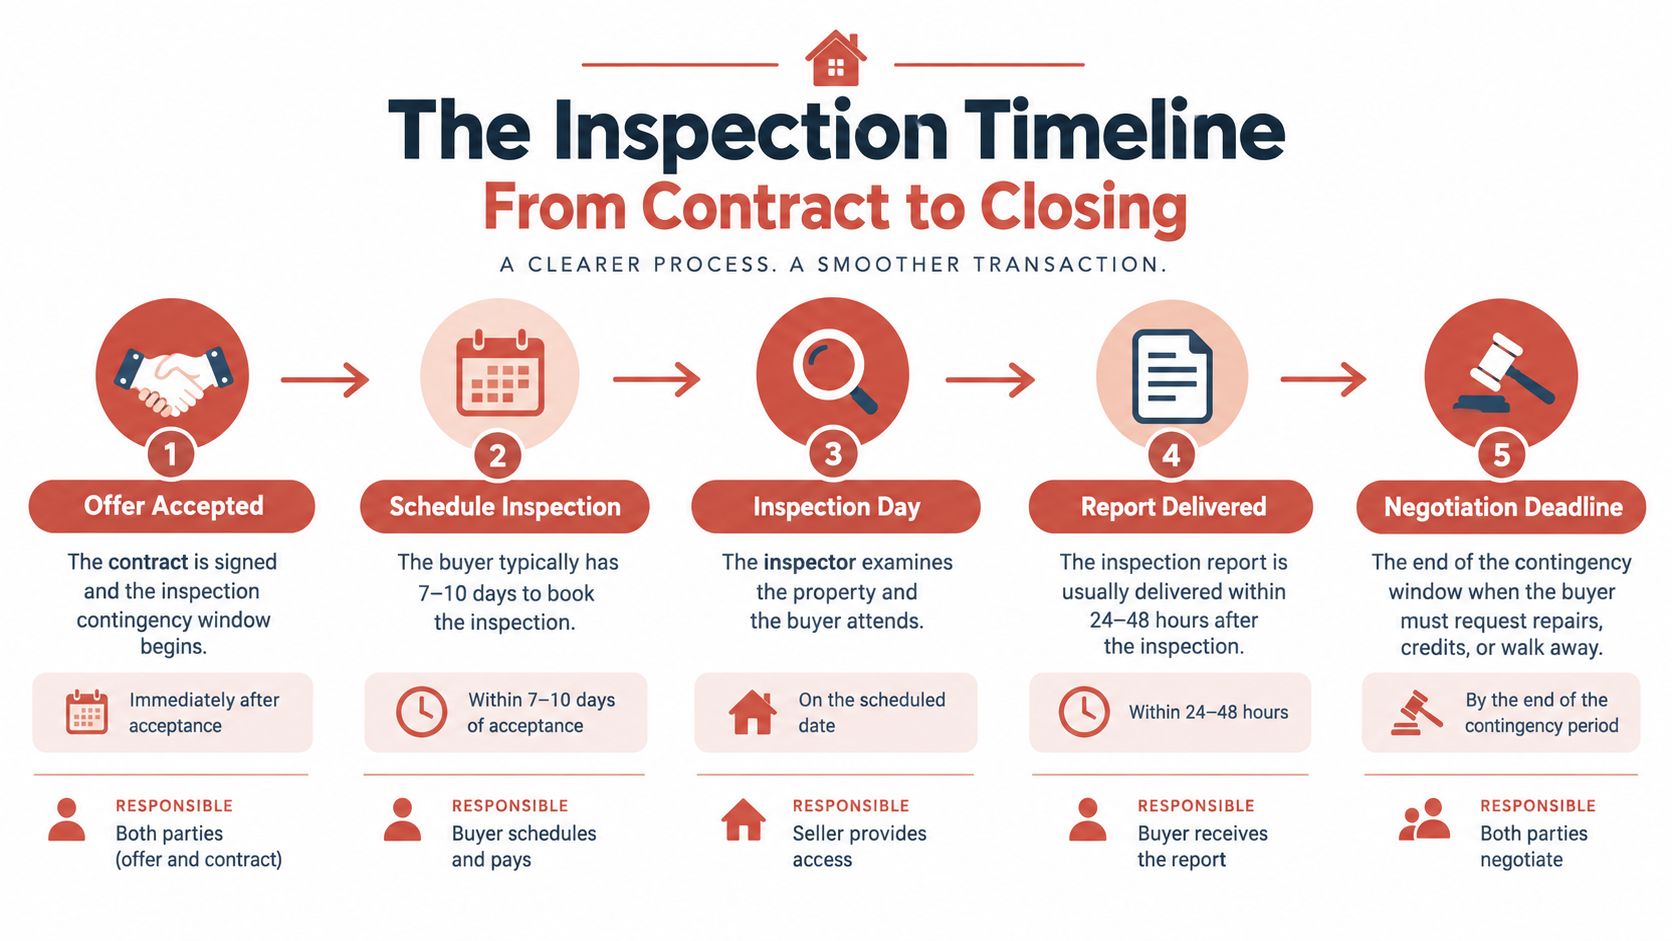
Set dates from the contract
Use this sequence as a planning framework, not a substitute for the actual agreement:
- After acceptance. Confirm who's arranging the inspection, how access will be provided, and what the inspection agreement includes.
- When booking. Ask when the written report will arrive. Leave room to review it and obtain specialist input before the contractual response deadline.
- Before the appointment. Coordinate any separate radon, sewer, or other evaluations so they don't become an afterthought.
- After report delivery. Review significant findings with your agent and, where appropriate, your attorney before submitting a response.
- Before closing. Establish how agreed work will be documented and verified.
The buyer should choose an independent inspector and clarify fees, attendance, scope, and report delivery directly. The seller's practical responsibilities are different: coordinate entry, prepare the property, and avoid scheduling work that interferes with the inspection.
Choose preparation timing deliberately
A pre-listing inspection gives a seller time to understand conditions before negotiating with a buyer. Consider it when the property's maintenance history is unclear, particularly for an inherited home or one with extensive past remodeling.
The trade-off is that learning about a problem creates a decision to address it, investigate it, or discuss appropriate disclosure with counsel. Don't commission a report expecting that you can ignore inconvenient findings.
A post-offer inspection operates under more immediate transaction pressure. That's why specialist availability and report turnaround belong in the scheduling conversation from the beginning.
Keep a shared calendar with appointments, report commitments, response dates, and verification tasks. If further evaluation won't fit, ask your attorney about seeking a written extension rather than assuming everyone will accommodate a late response.
Preparing the Property Room by Room
Use a two-pass preparation process. First, walk through the property to identify access problems and observable concerns. Then decide what you can safely correct, what needs a qualified professional, and what should be documented rather than hurriedly altered.
The ASHI Standard of Practice addresses readily accessible, visually observable components. Inspectors aren't required to dismantle finished surfaces or investigate concealed conditions, so blocking a problem doesn't resolve it.
Walk the exterior and service areas first
Start at ground level outside. Look for damaged gutters, disconnected downspouts, failed exterior caulk, and drainage directing water toward the foundation. Leave roof climbing, flashing repairs, and questionable structural conditions to qualified professionals.
In the garage, attic-access area, basement, and mechanical room, focus on visibility. Move stored belongings away from equipment and access openings without disturbing wiring, insulation, or suspect materials.
A finished basement deserves particular care. Don't cover staining with furniture or paint and assume the question has disappeared. Record what you know about prior water entry and any corrective work.
Test the rooms as functional spaces
Kitchen. Run faucets and inspect visible supply and drain connections underneath. Check included appliances using normal controls, and note anything that doesn't operate as expected.
Bathrooms. Flush toilets, run fixtures, and watch for leakage around accessible connections. A newly cleaned cabinet won't answer a question about recurring moisture beneath the sink.
Bedrooms and common areas. Check accessible windows and doors for operation and latching. Secure loose handrails, remove trip hazards, and test smoke and carbon-monoxide alarms according to their instructions.
Mechanical and electrical areas. Replace the HVAC filter with the appropriate type and make equipment accessible. Don't remove electrical-panel covers, modify wiring, or attempt gas repairs as a preparation project.
For buyers, the same functional mindset helps distinguish attractive finishes from a move-in-ready home. Evaluate how the property works, not just how recently someone decorated it.
Leave a usable property and a usable file
Organize permits, invoices, warranties, equipment information, and service records by system. Label known shutoff valves accurately, and explain documented repairs without promising that they eliminate every possible concern.
- Leave utilities operating. Coordinate any reconnection before the appointment.
- Open necessary areas. Make garage, attic, crawlspace, and mechanical access available.
- Clear working space. Keep the electrical panel and equipment unobstructed.
- Leave hazardous work alone. Refer exposed wiring, unsafe gas work, and structural concerns to qualified tradespeople.
Preparation should make the house easier to evaluate, not temporarily disguise how it behaves.
The Most Common Inspection Findings and How to Triage Them
Frequency and seriousness aren't the same thing. A damaged door handle may be easy to identify and repair, while an electrical hazard can require urgent attention even if it occupies only a short paragraph in the report.
HUD's published deficiency list provides a useful reality check. It records 28,789 damaged door-hardware or lock findings, 20,814 missing, damaged, or inoperable refrigerators, 16,307 damaged door surfaces, and 11,760 inoperable or non-locking windows in its housing-inspection dataset, not a representative sample of private home sales, according to the HUD Top 25 deficiencies list.
These categories support a practical preparation priority: check basic operation before spending time on decorative improvements.
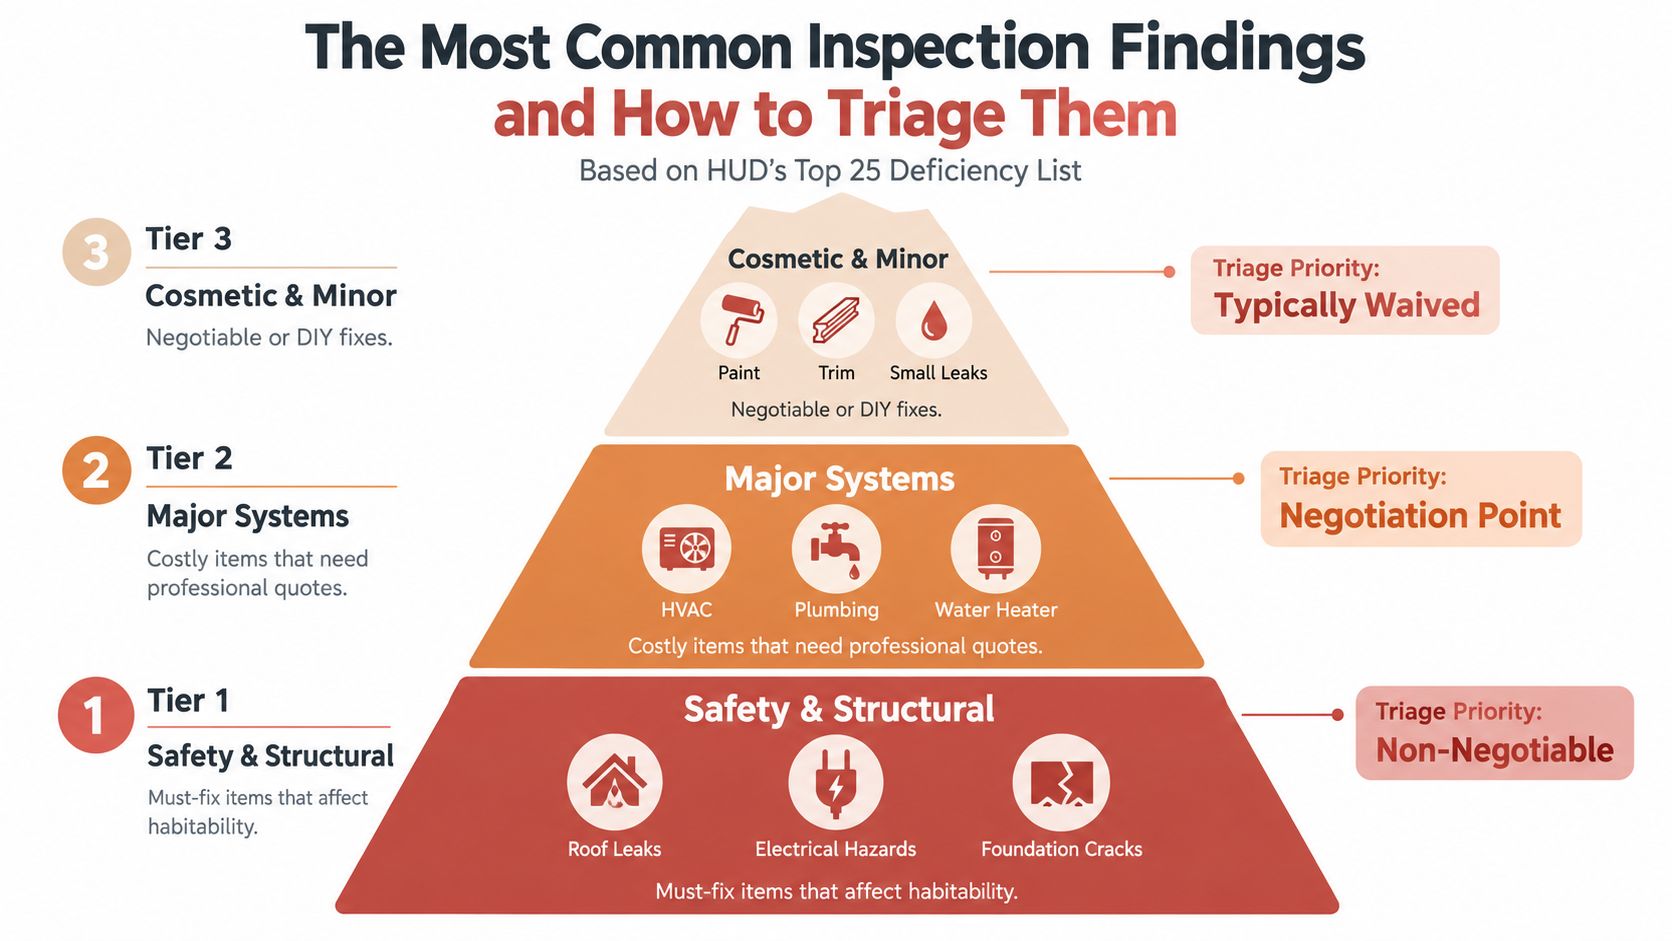
Rank the consequence before the repair cost
Use the following distinctions when reading a report:
| Finding category | Practical response |
|---|---|
| Immediate safety concern | Arrange qualified evaluation and appropriate correction rather than debating appearance or convenience. |
| Active water intrusion | Identify the entry point and underlying cause before choosing a repair. |
| Structural concern | Obtain a specialist's assessment instead of interpreting cracks from photographs alone. |
| Potential financing or insurance obstacle | Ask the lender or insurer what documentation or work they require. |
| Routine maintenance | Evaluate condition, scope, and responsibility without treating every item as a transaction emergency. |
| Cosmetic issue | Keep separate from material-condition negotiations unless it indicates something more serious. |
An older electrical panel needs a condition-specific evaluation, not a conclusion based on age alone. Likewise, don't declare a basement window compliant or noncompliant without understanding its location, use, and applicable requirements.
A small leak also isn't automatically cosmetic. Its urgency depends on where the water goes, what it affects, and whether someone has established the cause.
Resolve uncertainty with the right evidence
A specialist's written explanation is more useful than either party insisting that a condition has always been that way.
Ask for estimates that describe the defect and proposed scope, not just a total price. For a roof concern, distinguish localized repair from broader replacement recommendations. For plumbing, distinguish a fixture problem from an unresolved supply or drainage issue.
Water quality requires its own questions. If lead in drinking water is a concern, use the Water Filter Advisor 2026 lead guide to prepare questions about testing, then confirm sampling instructions and interpretation with the testing professional. Don't treat a visual plumbing review as a water-quality result.
The strongest negotiation file connects each important finding to photographs, a qualified assessment, and a proposed resolution. That's more persuasive than forwarding the entire report with an instruction to fix everything.
Chicago-Specific Hazards Worth a Separate Inspection
A general inspection can leave environmental and concealed-property questions unanswered. In Chicagoland, plan separate evaluations around the actual property rather than ordering a generic package or assuming a renovated interior means hidden risks were addressed.
The Chicago-area home hazard report identifies Cook County as an EPA Radon Zone 1 area, reports average indoor radon of 5.2 pCi/L, and states that 65% of county homes predate the 1978 lead-paint ban. Those area-level figures justify asking questions, but they don't establish conditions inside a particular home.
Match the evaluation to the concern
- Radon. Ask about property-specific testing and any existing mitigation documentation. A county designation isn't an individual test result.
- Older paint and remodeling. Discuss lead-based paint evaluation when the construction history or planned disturbance makes it relevant. Don't sand suspect surfaces to improve presentation.
- Sewer or private wastewater systems. Establish what serves the property and whether the general inspection leaves important components unevaluated.
- Staining, odors, or prior flooding. Investigate the moisture source and ask whether separate mold or concealed-moisture assessment is appropriate.
- Suspect older materials or equipment. Ask a qualified specialist whether asbestos or a buried oil tank warrants further investigation before disturbing anything.
Wood-destroying organism concerns also deserve a scope discussion with the inspector. Ask whether the inspection includes that evaluation or whether a separate qualified provider is needed.
For a property with a septic system, the HomeProBadge home service trust insights provide a starting point for questions about inspection scope and cost. Confirm the actual service arrangement rather than treating a septic evaluation and a sewer scope as interchangeable.
Understand what screening cannot prove
Infrared imaging can reveal temperature patterns associated with missing insulation, air leakage, moisture, or electrical hotspots. It doesn't independently establish the cause of a pattern or replace laboratory confirmation or invasive investigation when those are needed.
Ask what the operator observed, what explanation they consider likely, and what would confirm it. A colored image without a clear interpretation isn't a completed diagnosis.
Agree on testing arrangements before authorizing work. Specify who selects the provider, who pays initially, who receives the results, and how an abnormal result will be addressed. Don't assume a neighborhood custom overrides the contract or that discovering a concern automatically assigns the repair bill to the seller.
Negotiating Repairs, Credits, and Concessions After the Report
A useful inspection response connects a documented concern to a specific request. It doesn't ask the seller to make an older house new, and it doesn't dismiss a material defect because the buyer knew the property's age.
Choose the resolution according to the work involved, the remaining timeline, and each party's ability to verify completion. A seller repair, closing credit, and price reduction solve different problems.
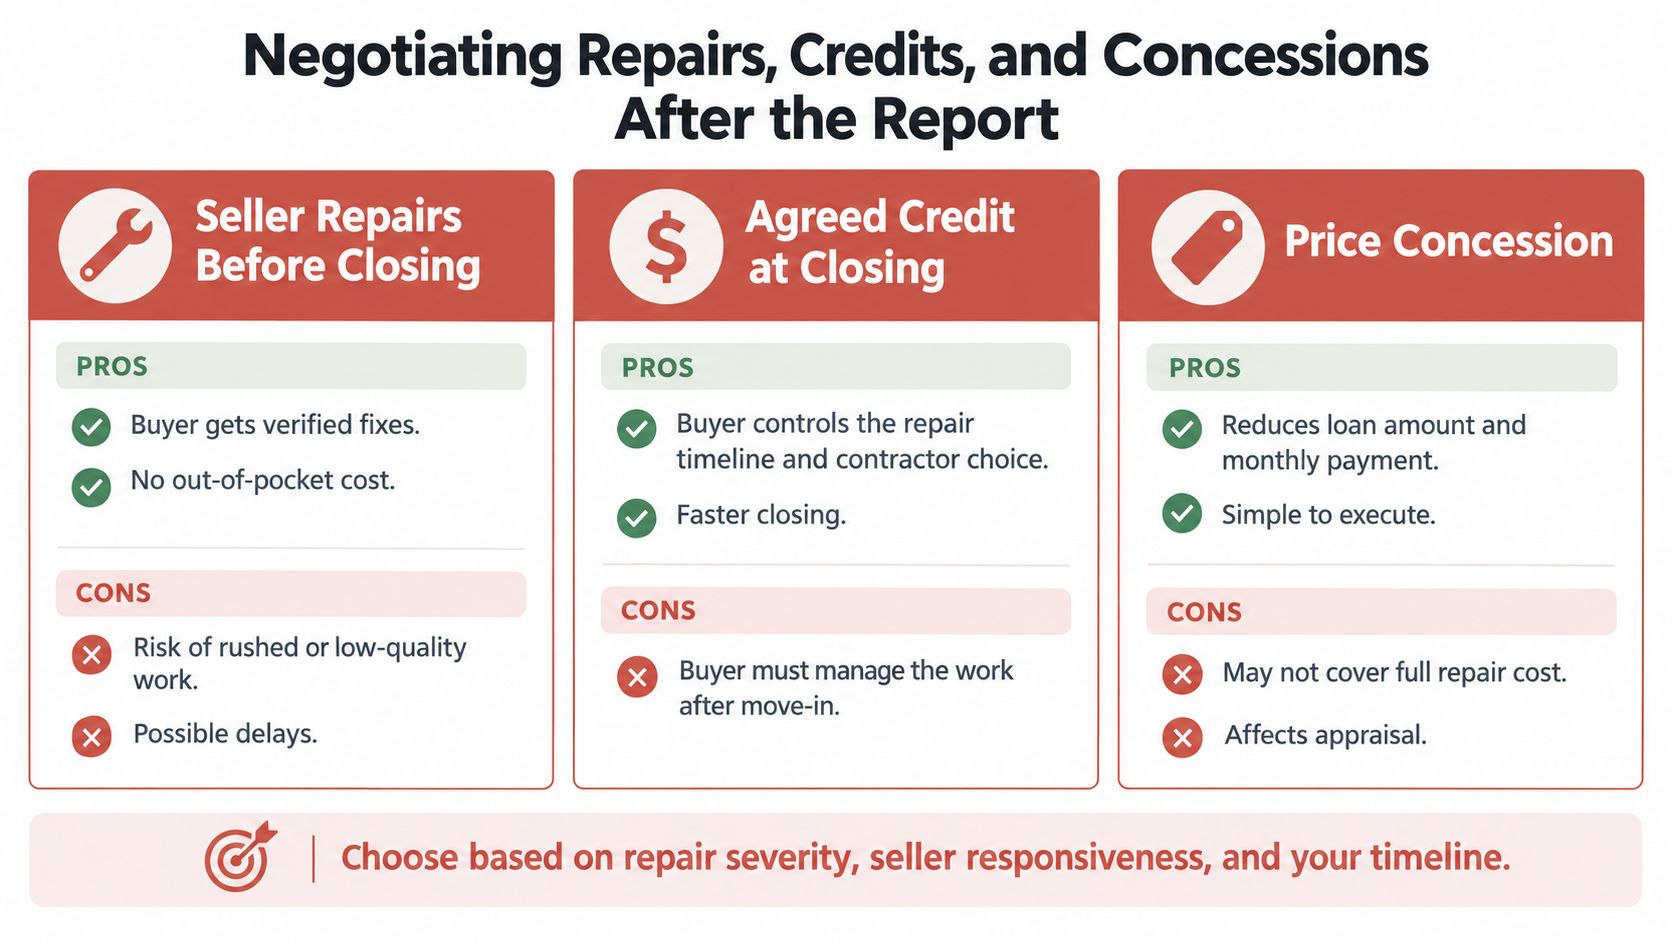
Choose the remedy before writing the request
Seller repairs make sense when the scope is clear and completion can be checked. Describe the work, who should perform it, what documentation is required, and how the buyer will verify the result. Avoid vague language such as making the roof satisfactory.
A closing credit can be preferable when the buyer wants control over contractor selection or the finished result. Ask the lender and closing team to confirm whether the proposed credit is permissible and how it would be applied. Don't assume it functions as unrestricted cash for future work.
A price reduction changes the purchase price, but it doesn't necessarily supply the buyer with money for an immediate repair. Consider the buyer's available funds as well as the negotiated amount.
For example, a documented roof concern might support a credit based on a roofer's scope rather than a rushed patch. An uncertain sewer condition might first justify a scope inspection, with the parties deciding on a remedy after they understand the findings. These are decision models, not accounts of completed transactions.
Make the request verifiable
- Identify the concern. Reference the report location and describe the observed condition.
- Attach supporting evidence. Include relevant photographs, specialist findings, and written estimates.
- State the proposed resolution. Specify repair, further evaluation, credit, or price adjustment.
- Confirm the process. Have your agent and attorney review timing, delivery requirements, and the proposed agreement.
The HUD homeowner-preparation guidance emphasizes addressing electrical and plumbing problems, cleaning, removing clutter, and completing maintenance. That's useful preparation, but it isn't an argument for rushing complicated work after a report arrives.
Negotiation principle: Ask for a remedy that resolves the identified risk, not a concession chosen before anyone understands the problem.
For Illinois transactions, have counsel determine how an objection, extension, agreement, or termination must be delivered under the signed contract. Don't assume an inspection disagreement automatically protects earnest money or creates an unrestricted right to cancel.
Use these real estate negotiation tips for buyers alongside property-specific professional advice. A focused, supported request gives the other party something concrete to evaluate.
Inspection Day, Closing, and What Comes Next
Buyers should arrange an opportunity to hear the inspector explain significant observations directly. Sellers should coordinate access and provide requested information without turning the appointment into a running defense of the house.
Ask the inspector how they prefer to handle questions. Keep notes on the location of concerns, recommended follow-up, and anything that couldn't be evaluated.
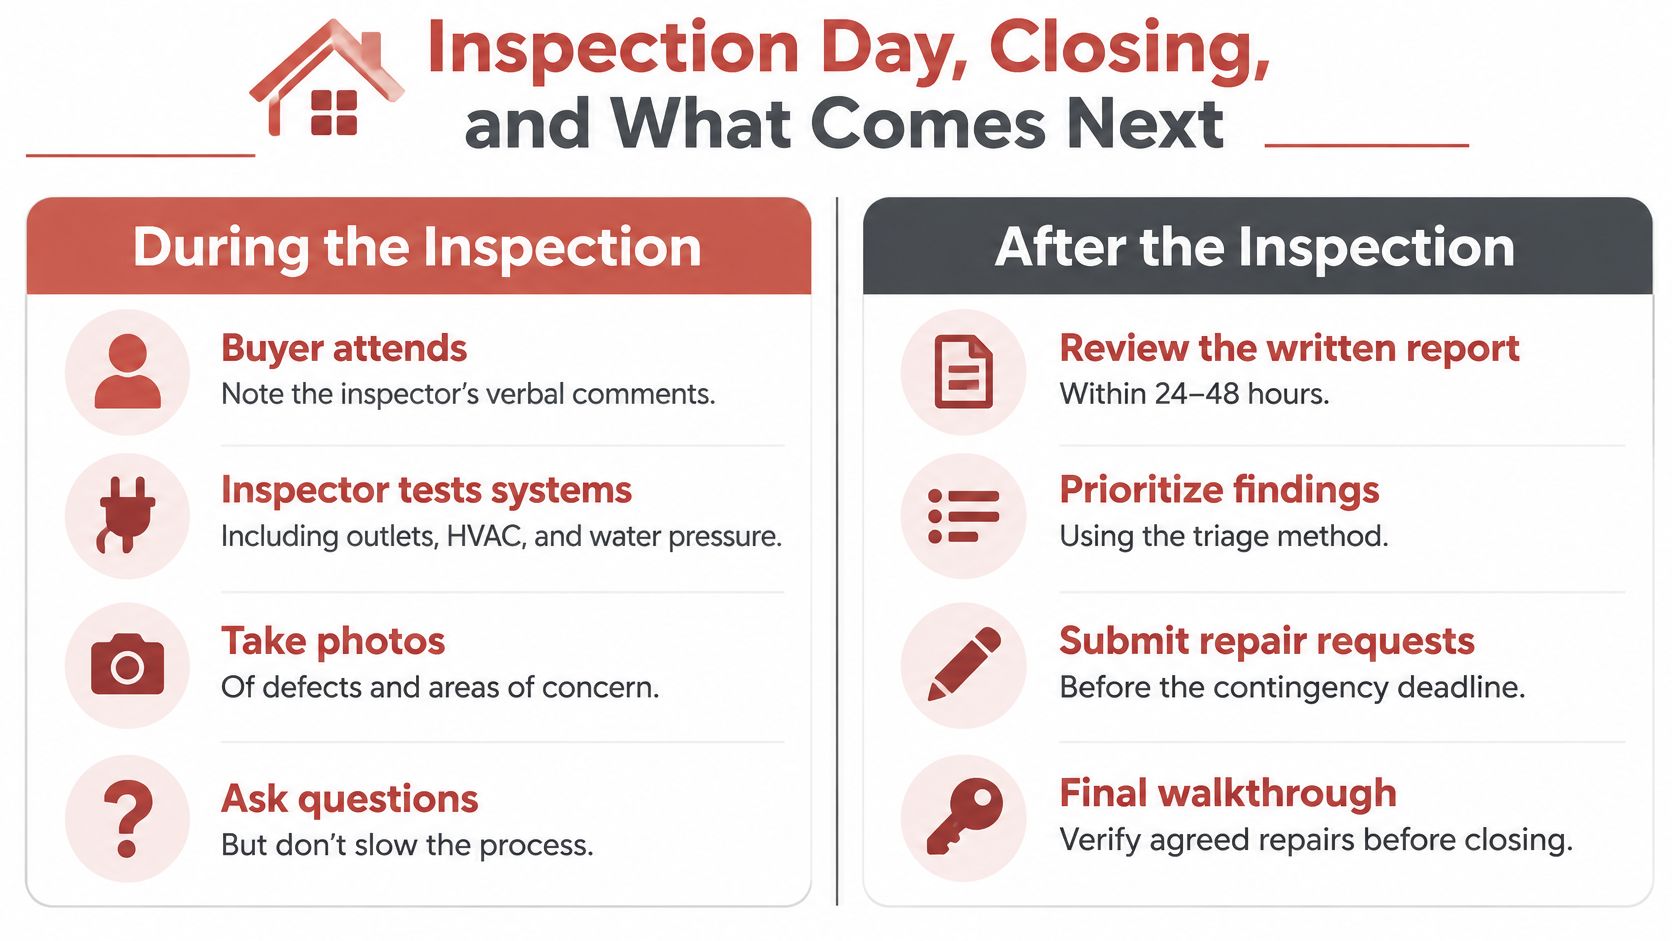
Respond to findings without guessing
If something concerning appears, ask whether the inspector observed a confirmed defect or a condition requiring further evaluation. That distinction helps prevent both overreaction and misplaced reassurance.
Don't authorize a remedy based solely on an alarming verbal comment. Review the written description, obtain the recommended specialist input, and have your transaction team address any deadline pressure.
Understanding what a real estate agent does for a buyer helps clarify coordination responsibilities. Your agent can organize communication and negotiations, but technical conclusions belong with the relevant professional.
Verify completion and keep the records
Treat the final walk-through as a verification appointment, not a ceremonial visit. Check the written repair agreement against the actual work and ask about discrepancies before proceeding.
- Compare the scope. Confirm that the invoice describes the agreed repair rather than an unrelated service call.
- Check supporting documents. Obtain required permits, warranties, and completion evidence.
- Request technical verification. Use an appropriate professional when visual confirmation isn't enough.
- Retain the file. Keep the inspection report, specialist reports, repair records, and environmental test results together.
After closing, turn unresolved maintenance recommendations into an ownership plan instead of leaving them buried in an email attachment. Keep the documents accessible for future repairs, questions, and resale preparation.
Knowing how to pass a home inspection ultimately means knowing how to make informed decisions about the house. An understandable condition report and a verified resolution are more valuable than an artificially short punch list.
Homes By Carmen offers buyer and seller representation in Melrose Park and western Chicagoland, including inspection coordination, repair negotiations, and closing support. Visit Homes By Carmen to discuss what to address before listing or how to turn a buyer's inspection findings into a focused, practical response.